This guide will explain how to record a narrated presentation via Microsoft Teams, from the video call function. The video call function can be used to screen share and record your desktop and any content displayed on your desktop, such as PowerPoint slides.
Overview
- Start a video call meeting in Teams
- Start a recording of your presentation / present your content
- Access and download a recording
- Share your recording with the Learning Enhancement and Support team
- Upload your recording directly to Echo360
Start a video call meeting in Teams
- Open Microsoft Teams from a browser or the app. Please see further guidance on the following help page; accessing Microsoft Teams.
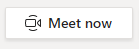 Click on the meet now option from your Teams calendar to start a video call (please click on the following link for further guidance; creating video call meetings in Microsoft Teams).
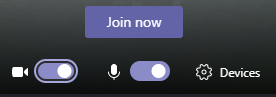 You will now see an option to join now. Before you join, select devices to check that your preferred device settings are selected for audio and video input. Also check the audio icon indicates audio is on (a line through the icon means it is off).You can choose to turn off your video by double clicking on the video icon. This will mean your webcam will not show your image. If you leave your video on, your image will appear in the bottom right-hand corner during your recording. If you turn it off, it will show your initials or your saved profile picture.
- Click on join now when you are ready to start.
Start a recording of your presentation
- Navigate to your desktop and open your PowerPoint slides or other content you wish to narrate over (for example an image, a Word document, a website in your browser).
- Navigate back to the Teams video call you have started.
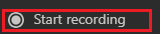
 Select more options/ start recording from the call menu bar. As explained above, if you are a guest, you will need to have arranged a call with a non-guest to record on your behalf.
- In the call menu bar now choose to screen share your desktop (please click on the following link for further guidance; screen share during a video call in Microsoft Teams).

Choose from the listed options to share:
- your desktop (useful if you want to share views of multiple items you are accessing – browser windows, your desktop, and files etc,.)
- a browser window only (useful for sharing a view on one item you are accessing – a browser window, a file you have open etc,.)
- a PowerPoint file only
Present your content
- If you are presenting only slides, navigate to your PowerPoint slides on your desktop and open slide show view.
- You can now present your slides and narrate over the content.Your voice and the slide show view of your slides will be recorded, as well as either your image in the right-hand corner or your initials / profile picture.
- To stop sharing, navigate back to the meeting tool bar in Teams and select stop sharing.

- To stop recording, navigate back to the meeting tool bar and select stop recording.
Access and download a recording
In chat in Teams, you will see the ‘meeting’ listed that you set up above with a notification that a recording is now ready. This may take a while to appear. If someone set this up on your behalf because you are a guest, they will see this notification in their chat history. They can download and share content with you if required.
If the recording was done via a meeting in a Teams channel, the recording will appear in the meeting chat for that Team’s channel. The option to download content will appear as displayed in the screenshot below.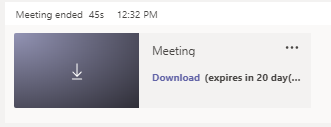
Share your recording with the Learning Enhancement and Support team
You can notify the Learning Enhancement and Support team that you have made a recording at help@hyms.ac.uk. We will then be able to transfer your recording to the Echo360 platform and share your content in Blackboard, as required.
One method of sharing your recording with us is to upload it to OneDrive.
- Log in to your HYMS Office 365 account and navigate to OneDrive. Please see our help pages at the following links; access your HYMS email via a Web Browser and sharing OneDrive and Microsoft Teams files.
 Choose to upload a file and upload your recording.
- Once the recording is uploaded, right click on the file and choose to share.

- You can specify to share the link with editing rights to an individual’s email address.

Upload your recording directly to Echo360
HYMS staff with the required level of access to Echo360, can also upload content directly to Echo360.
- Log in to the Echo360 online platform.
- Log in with your HYMS details in the format hyxxxx@hyms.ac.uk + HYMS password. Then log in with your username (hyxxxx) + HYMS password.
 Click on create in the left-hand corner on the homepage.
- Select upload media and upload your recording.
 Navigate to library on your Echo360 homepage. Search by date order. Once it is processed, your recording will appear as a recent upload.
 You will then be able to share your content. Hover over your recording and click on the more actions icon. Choose to share / then share to a class/ then search for the appropriate course location.
- You can share your content to an Echo360 course area, then create a link to it in Blackboard. Please also see the following help page regarding linking content on Blackboard; adding an Echo360 video to Blackboard
Please contact the Learning Enhancement and Support team at help@hyms.ac.uk if you require further support in linking content to Blackboard.