1. Before the Meeting
1.1 Share meeting links securely
To protect your meeting from unwanted access, never post meeting links publicly, such as on social media or open websites. If an event requires wider visibility, ask potential attendees to pre‑register and send meeting details only to vetted participants.
2. Setting Secure Meeting Options
Each scheduled Teams meeting includes a Meeting options panel that allows organisers to control the lobby, presenters, and access permissions.
2.1 How to access Meeting Options
You can open Meeting options in two ways:
- From the Teams meeting invite details
- From the meeting information inside the calendar event

2.2 Recommended security settings
Meeting options allow organisers to:
- Prevent unauthorised users from joining
- Control lobby behaviour
- Manage who can present
- Manage admission notifications

Suggested defaults for secure meetings

3. During the Meeting
Teams provides several real‑time controls to help you maintain a secure environment.
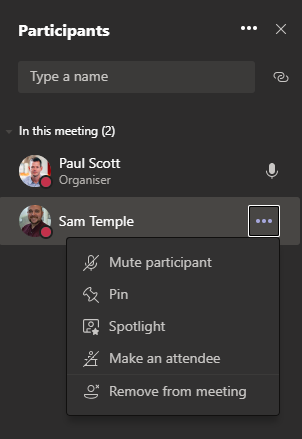
3.1 Accessing participant controls
To manage participants:
- Select People from the meeting bar.
- Hover over a participant’s name.
- Select More options (…).
- Choose an appropriate control.
3.2 Participant management tools
You can perform the following actions:
- Mute – Silence a participant’s microphone.
Useful for managing noise or disruptions. - Pin – Pin a participant so their video remains visible to you.
- Spotlight – Make a participant’s video the main focus for everyone in the meeting.
- Make Attendee / Make Presenter –
- Attendees cannot present or share their screen.
- Presenter can present and share content.
- Remove from meeting – Immediately eject a user from the meeting.
 Note:
Note:
Participants you remove can re‑join unless additional restrictions are applied.
4. Best Practices for Secure Meetings
4.1 For meeting organisers
- Enable the lobby for all users – To ensure you control who enters.
- Restrict presenting rights – To prevent accidental or malicious screen‑sharing.
- Remove disruptive users immediately – Using the participant controls.
4.2 For public or external‑facing sessions
- Always vet registrants before sharing meeting links.
- Consider using a waiting room (lobby) for manual admission.
- Use “attendee” mode for non‑presenting guests.
5. After the Meeting
- Review meeting chat and shared files.
- Remove any guest access that is no longer required.
- Save or delete recordings according to organisational policies.
6. Summary
A secure Microsoft Teams meeting relies on:
- Sharing links responsibly
- Configuring Meeting options correctly
- Actively managing participants during the session
Using the tools provided in Teams helps ensure your meeting remains controlled, professional, and safe for all participants.